Translator Media Asset Manager
Timeframe: 7 months
Role: UX research, UX design, eng hand-off
Impact: Improvements to NBCU brands employees’ daily workflow
Translator is an existing system used by external brands like Netflix or Amazon to order NBCU media content (such as an episode of This Is Us). I led the research effort to build a new Media Asset Management (MAM) system within Translator so that NBCU employees like production assistants and media managers have one central place to house their assets.
Currently, all the NBCU cable brands have different ways of managing their media assets. Our task was to create one tool that works for all the brands. The brands are very reliant on the folder structure and since search is not enabled on the brand storage systems to prevent crashing the server, users must navigate through the folder structure to find files. If someone misplaces a file or accidentally drags a file into another folder, it will be difficult to recall it given the fluidity of the naming convention. Each brand has a different folder structure and each team within a brand may have a different naming convention. The purpose of the MAM is to enforce a strict, uniform structure amongst all brands and reduce their reliance on the folder structure by replacing their current storage SAN with a cloud system that is smart-search enabled.
Discovery research
My first step to tackling this puzzle was to understand the production workflow, how content is requested and by who, how content is created, and then how content is distributed. I interviewed over 20 users from NBCU cable brands and observed them in their environment to understand their workflows and how their roles ultimately contribute to production.
From these discovery sessions, I asked them about their role, goals, tools they used, and what their day-to-day to was like. From there, I was able to map each user’s journey through their everyday tasks and identify their pain points to help create requirements for what they needed in a Media Asset Manager system. Below is an example of a user journey from a Bravo Multimedia Manager describing how they ingest and publish video clips.

Major workflows identified
Across all 20 users, I identified major workflows that helped us build requirements for what we needed in a media asset management system.


Card sorting
To understand the important pieces of information needed to register a piece of content, we did card sorting with some of the users we interviewed.
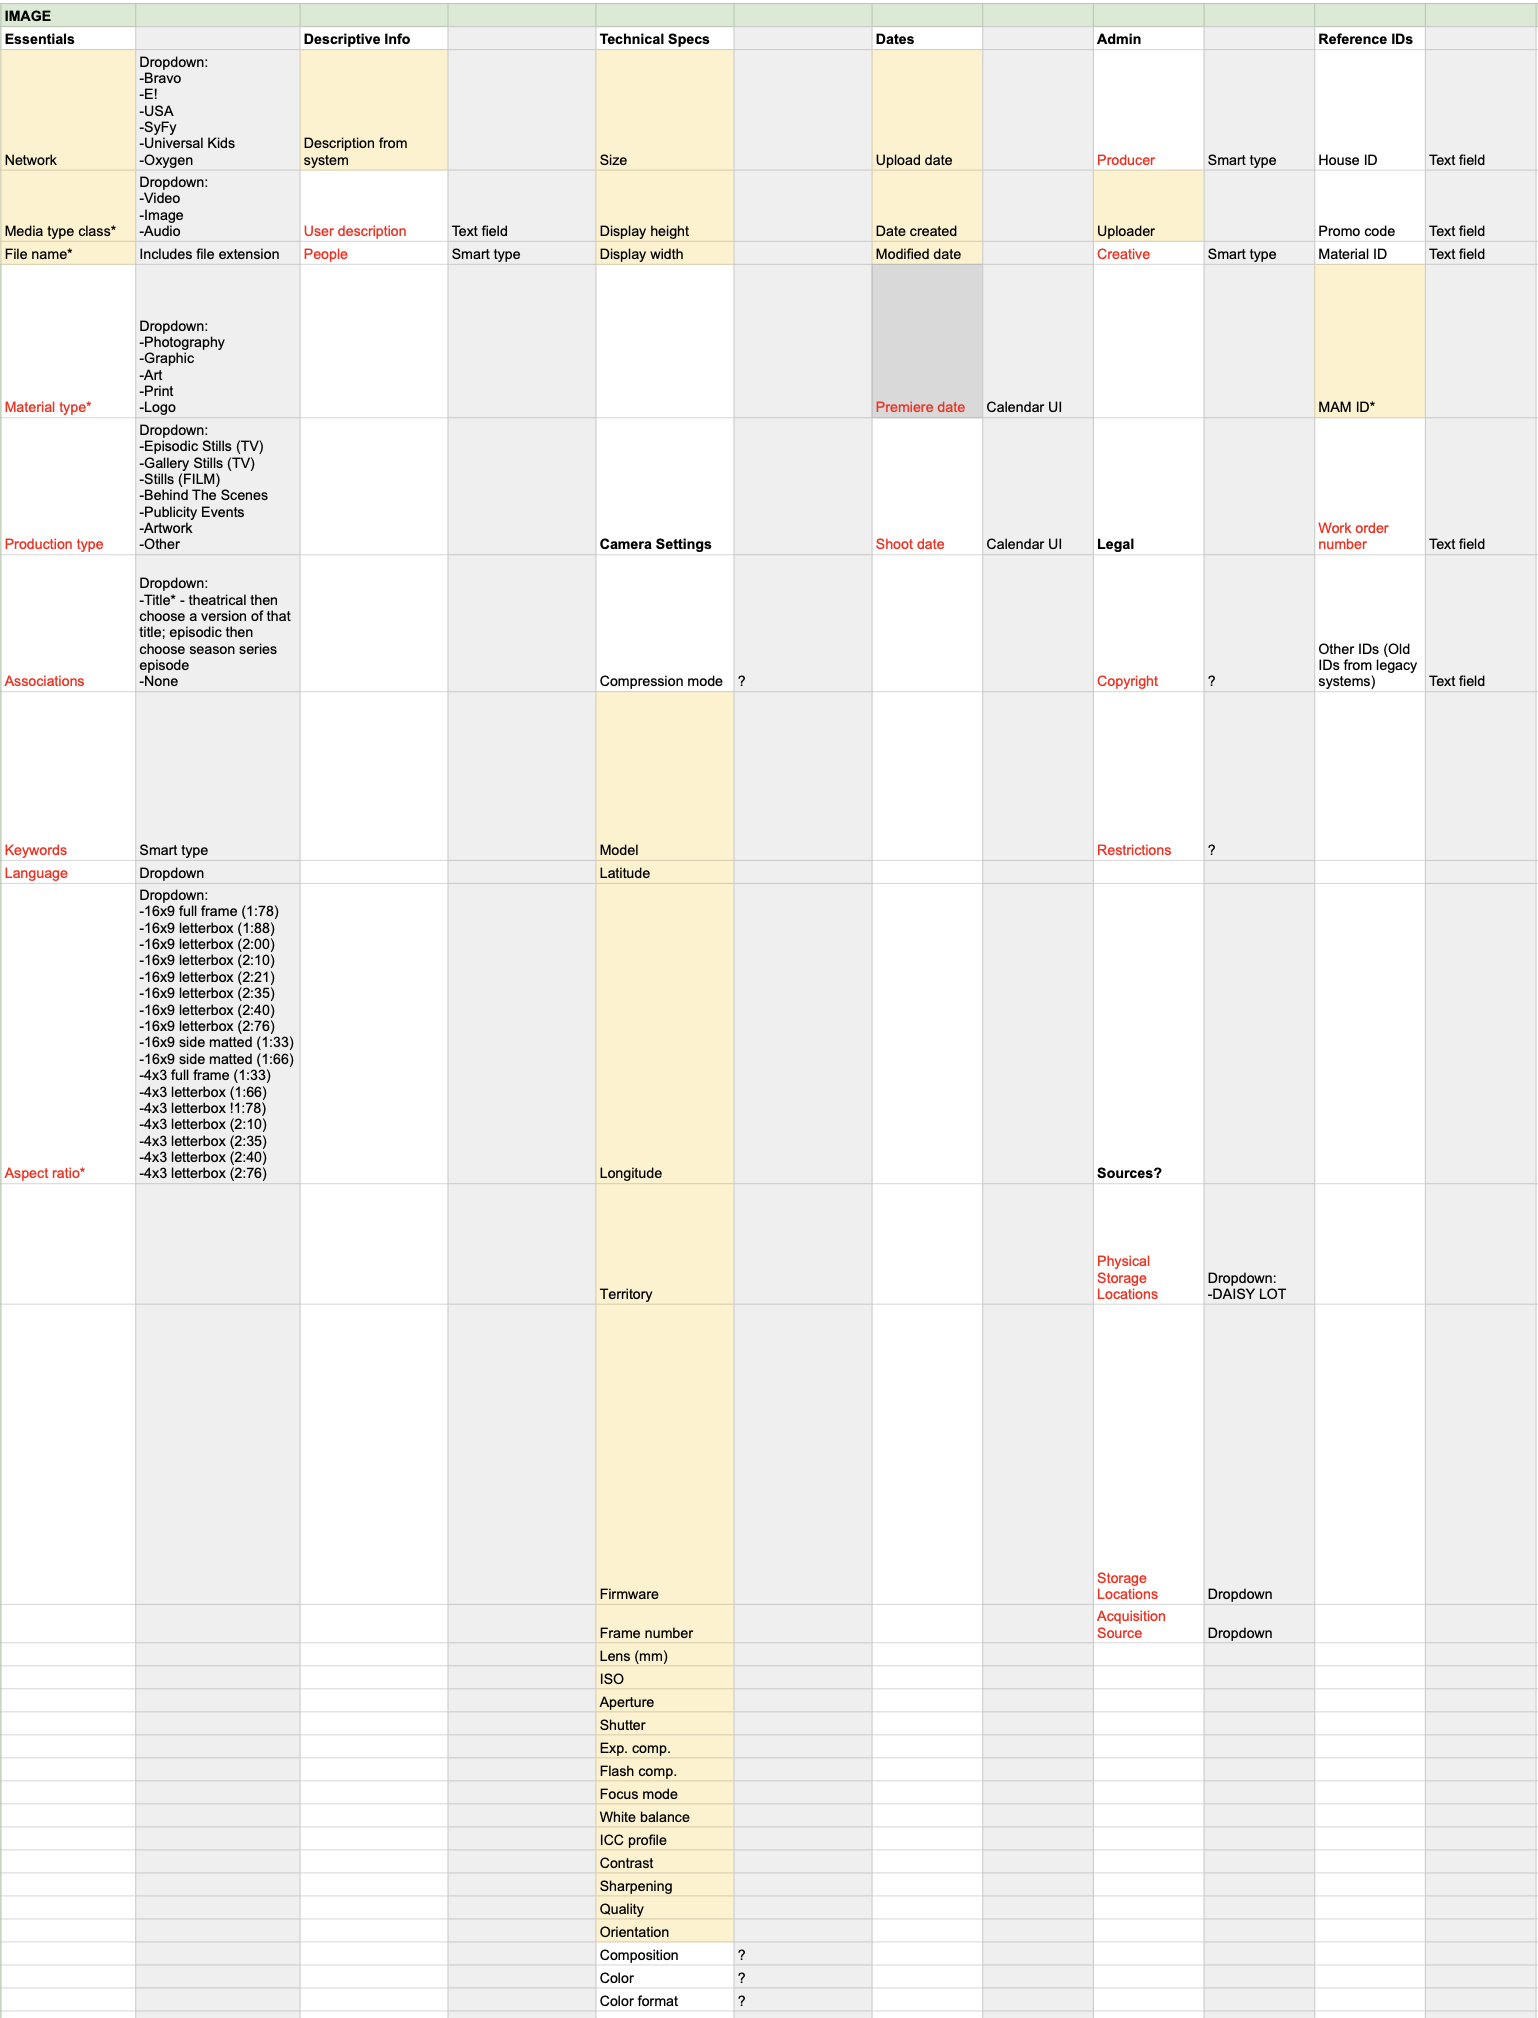
We gave users cards with all the metadata on them and asked them to organize them by: basic information, additional fields, search optimized, required to get in, mandatory and auto, important but not mandatory, technical data, administrative data, and descriptive data. Users could choose the categories they wanted to group the metadata by.
We found that users had different metadata that was important to them based on the type of media it was (video, audio, and image). Based on how all the users grouped their metadata, we came up with a proposal for the form fields for each type of asset in MAM below. The comprehensive card sorting results are 🔗 here.


Requirements

Ideal content registration workflow we are designing for
Based on our discovery research and card sorting exercise, I came up with a list of requirements that were necessary to our users in a MAM.
Infrastructure for the assets library to enable smart search function
Capturing minimum metadata and file naming convention
Upload progress of the assets (percentage, time remaining)
Permission settings
Configurable notification settings to relevant parties
Bulk actions
Bulk upload
Bulk edit: owner, permissions, purge date, content type, record type, closed captioning
Thumbnails and preview

Ideal workflow we want the MAM to accomplish
Wireframes
🔗 Here are the wireframes I created showing three different flows with ideas from our ideation session incorporated:
Create a new project and register content
Edit an existing project item
Upload new content to an existing project and bulk edit
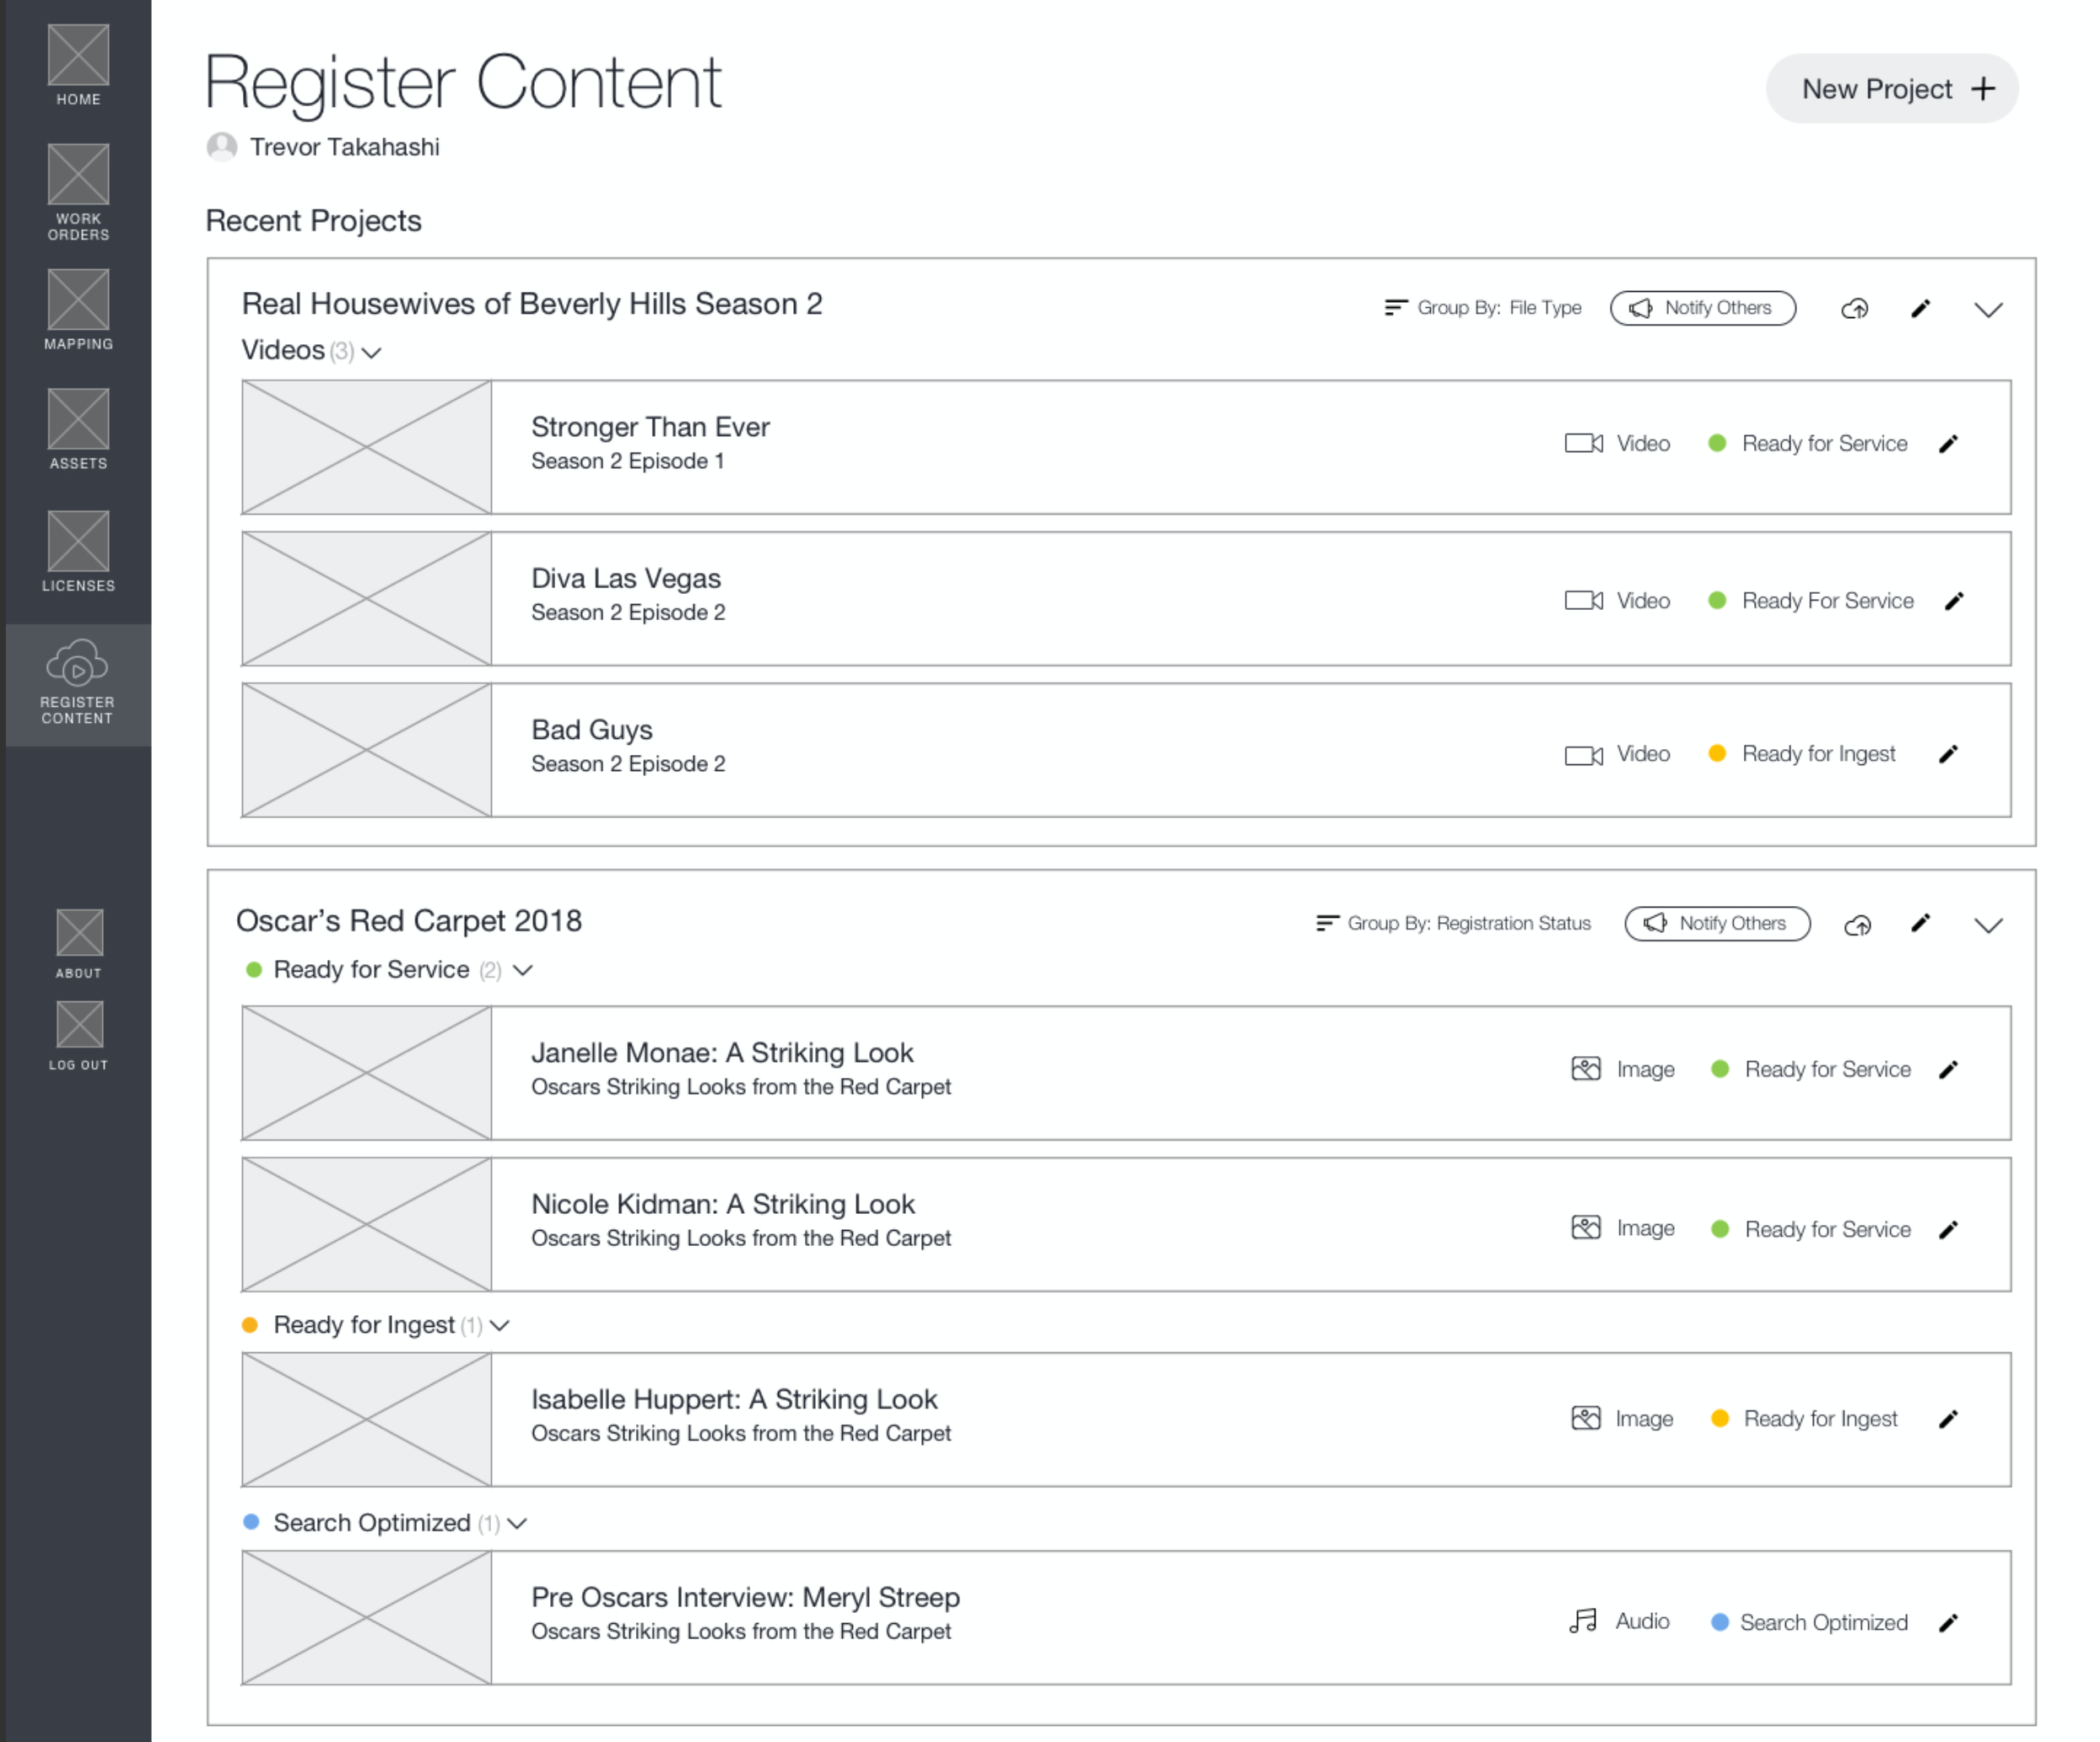
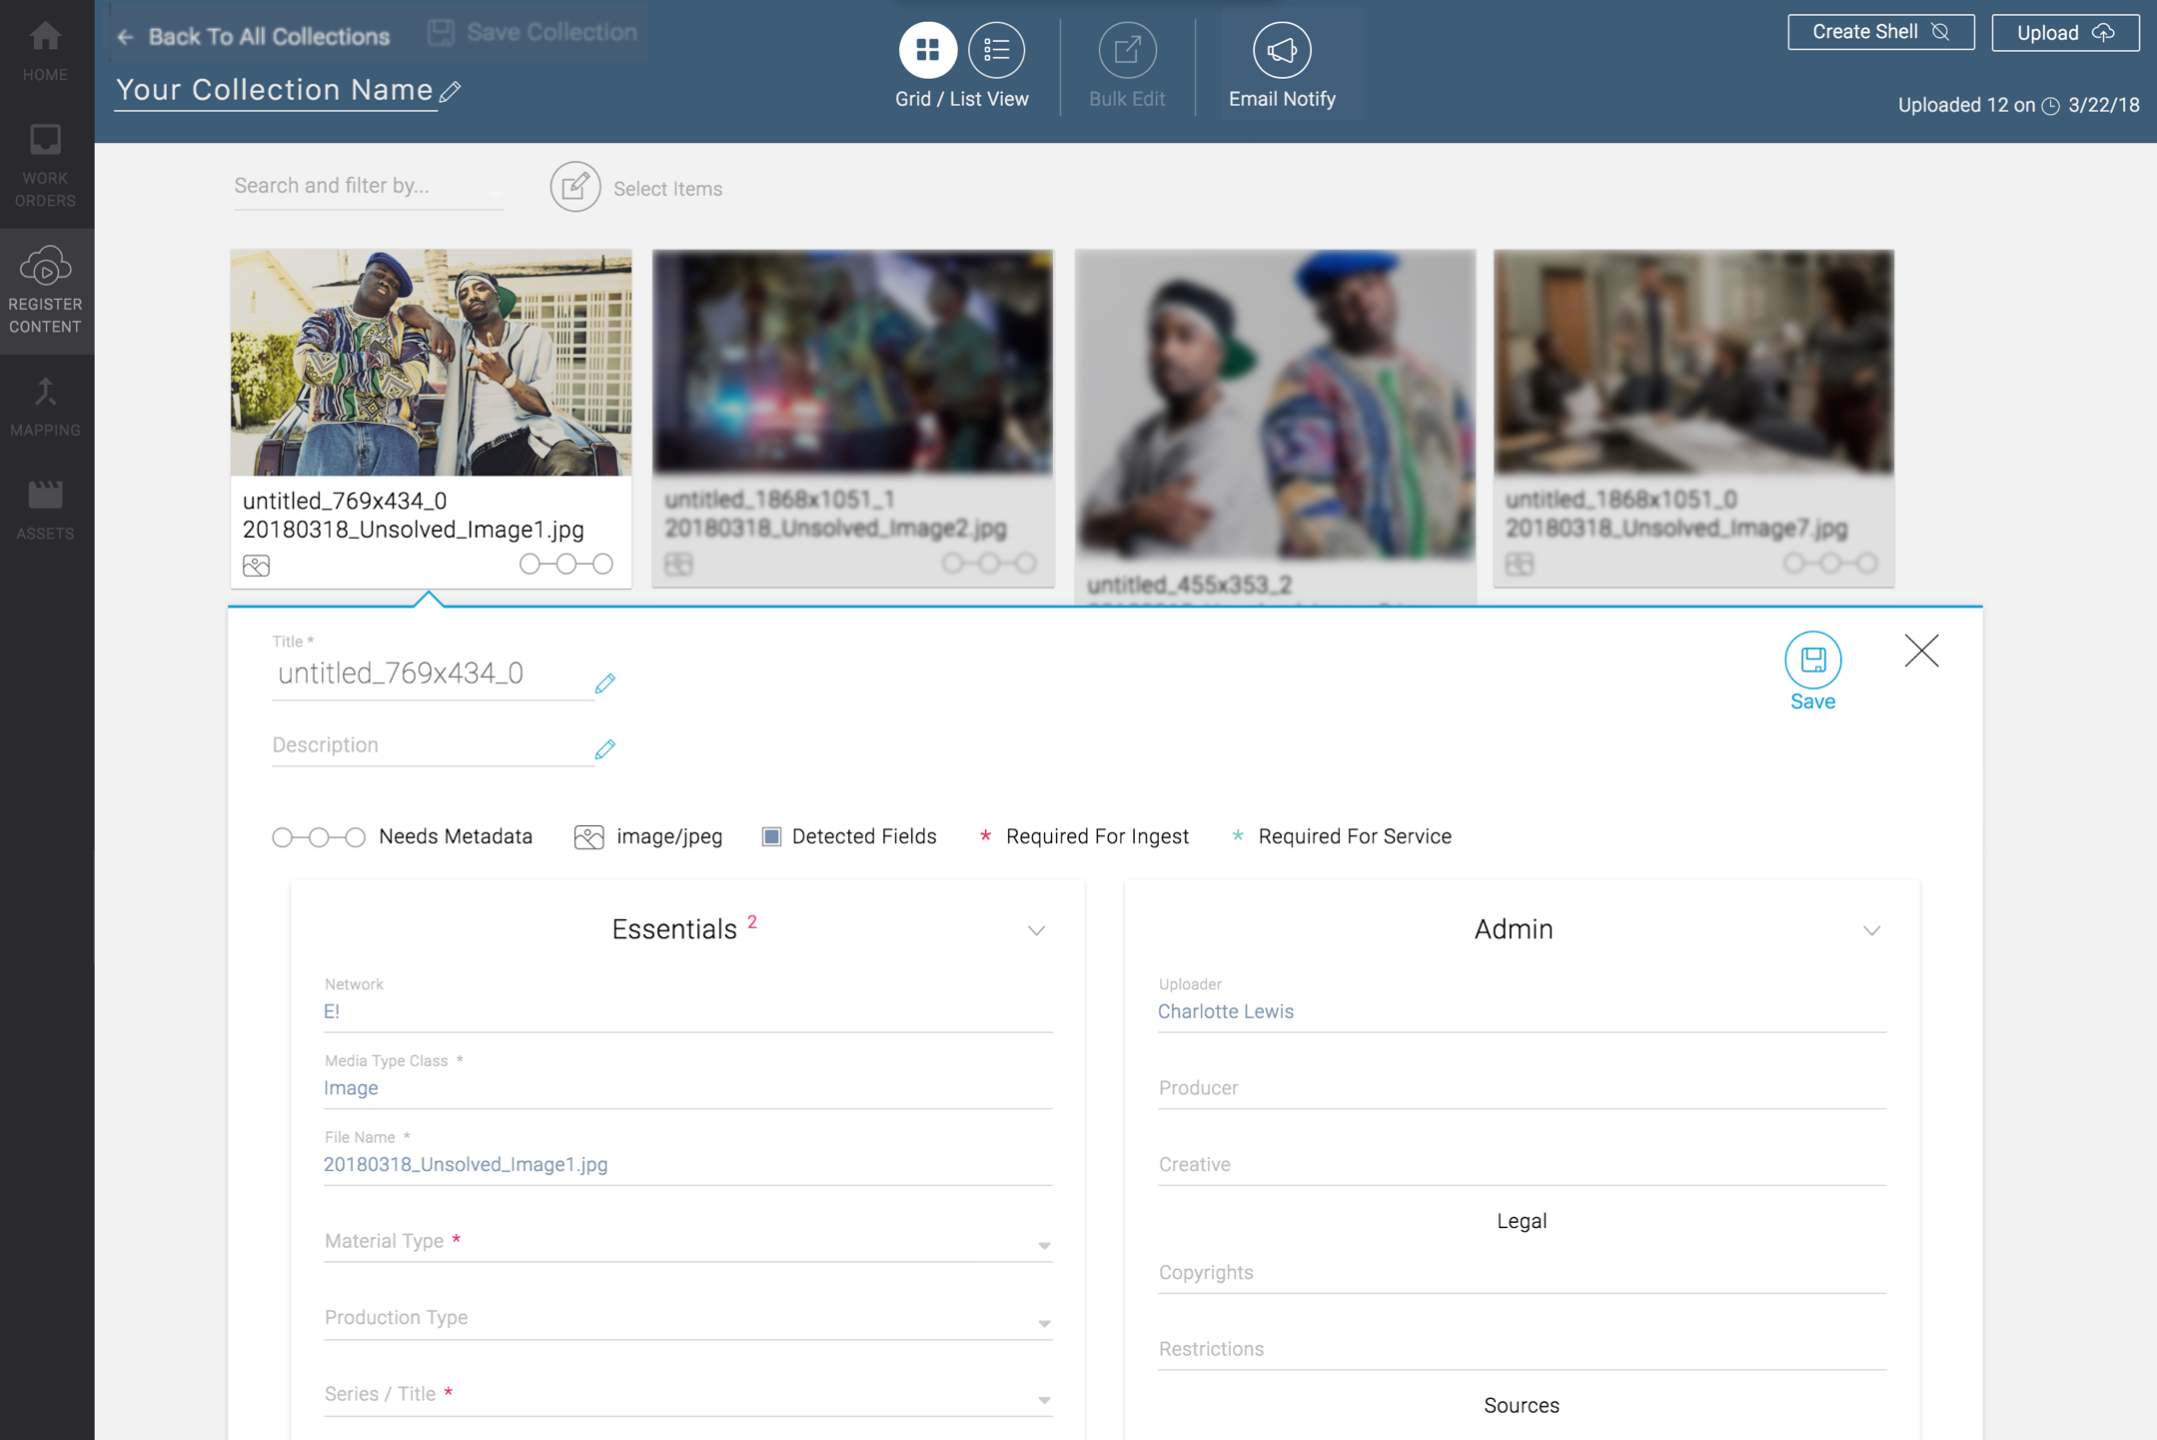
Homepage of the MAM: Users can see their latest projects and group files either by file type or registration status. Depending on how much metadata the user inputted when registering an asset, the file can be marked as Ready for Service, Ready for Ingest, or Search Optimized. Stage-based (ingest, proxy, servicing) metadata editing with progress state was an idea from our ideation session. Ready for Ingest is the bare minimum metadata for the asset to exist in the system. Ready for Service means that the asset is usable. Search Optimized means that the asset can easily be searched for in the MAM.
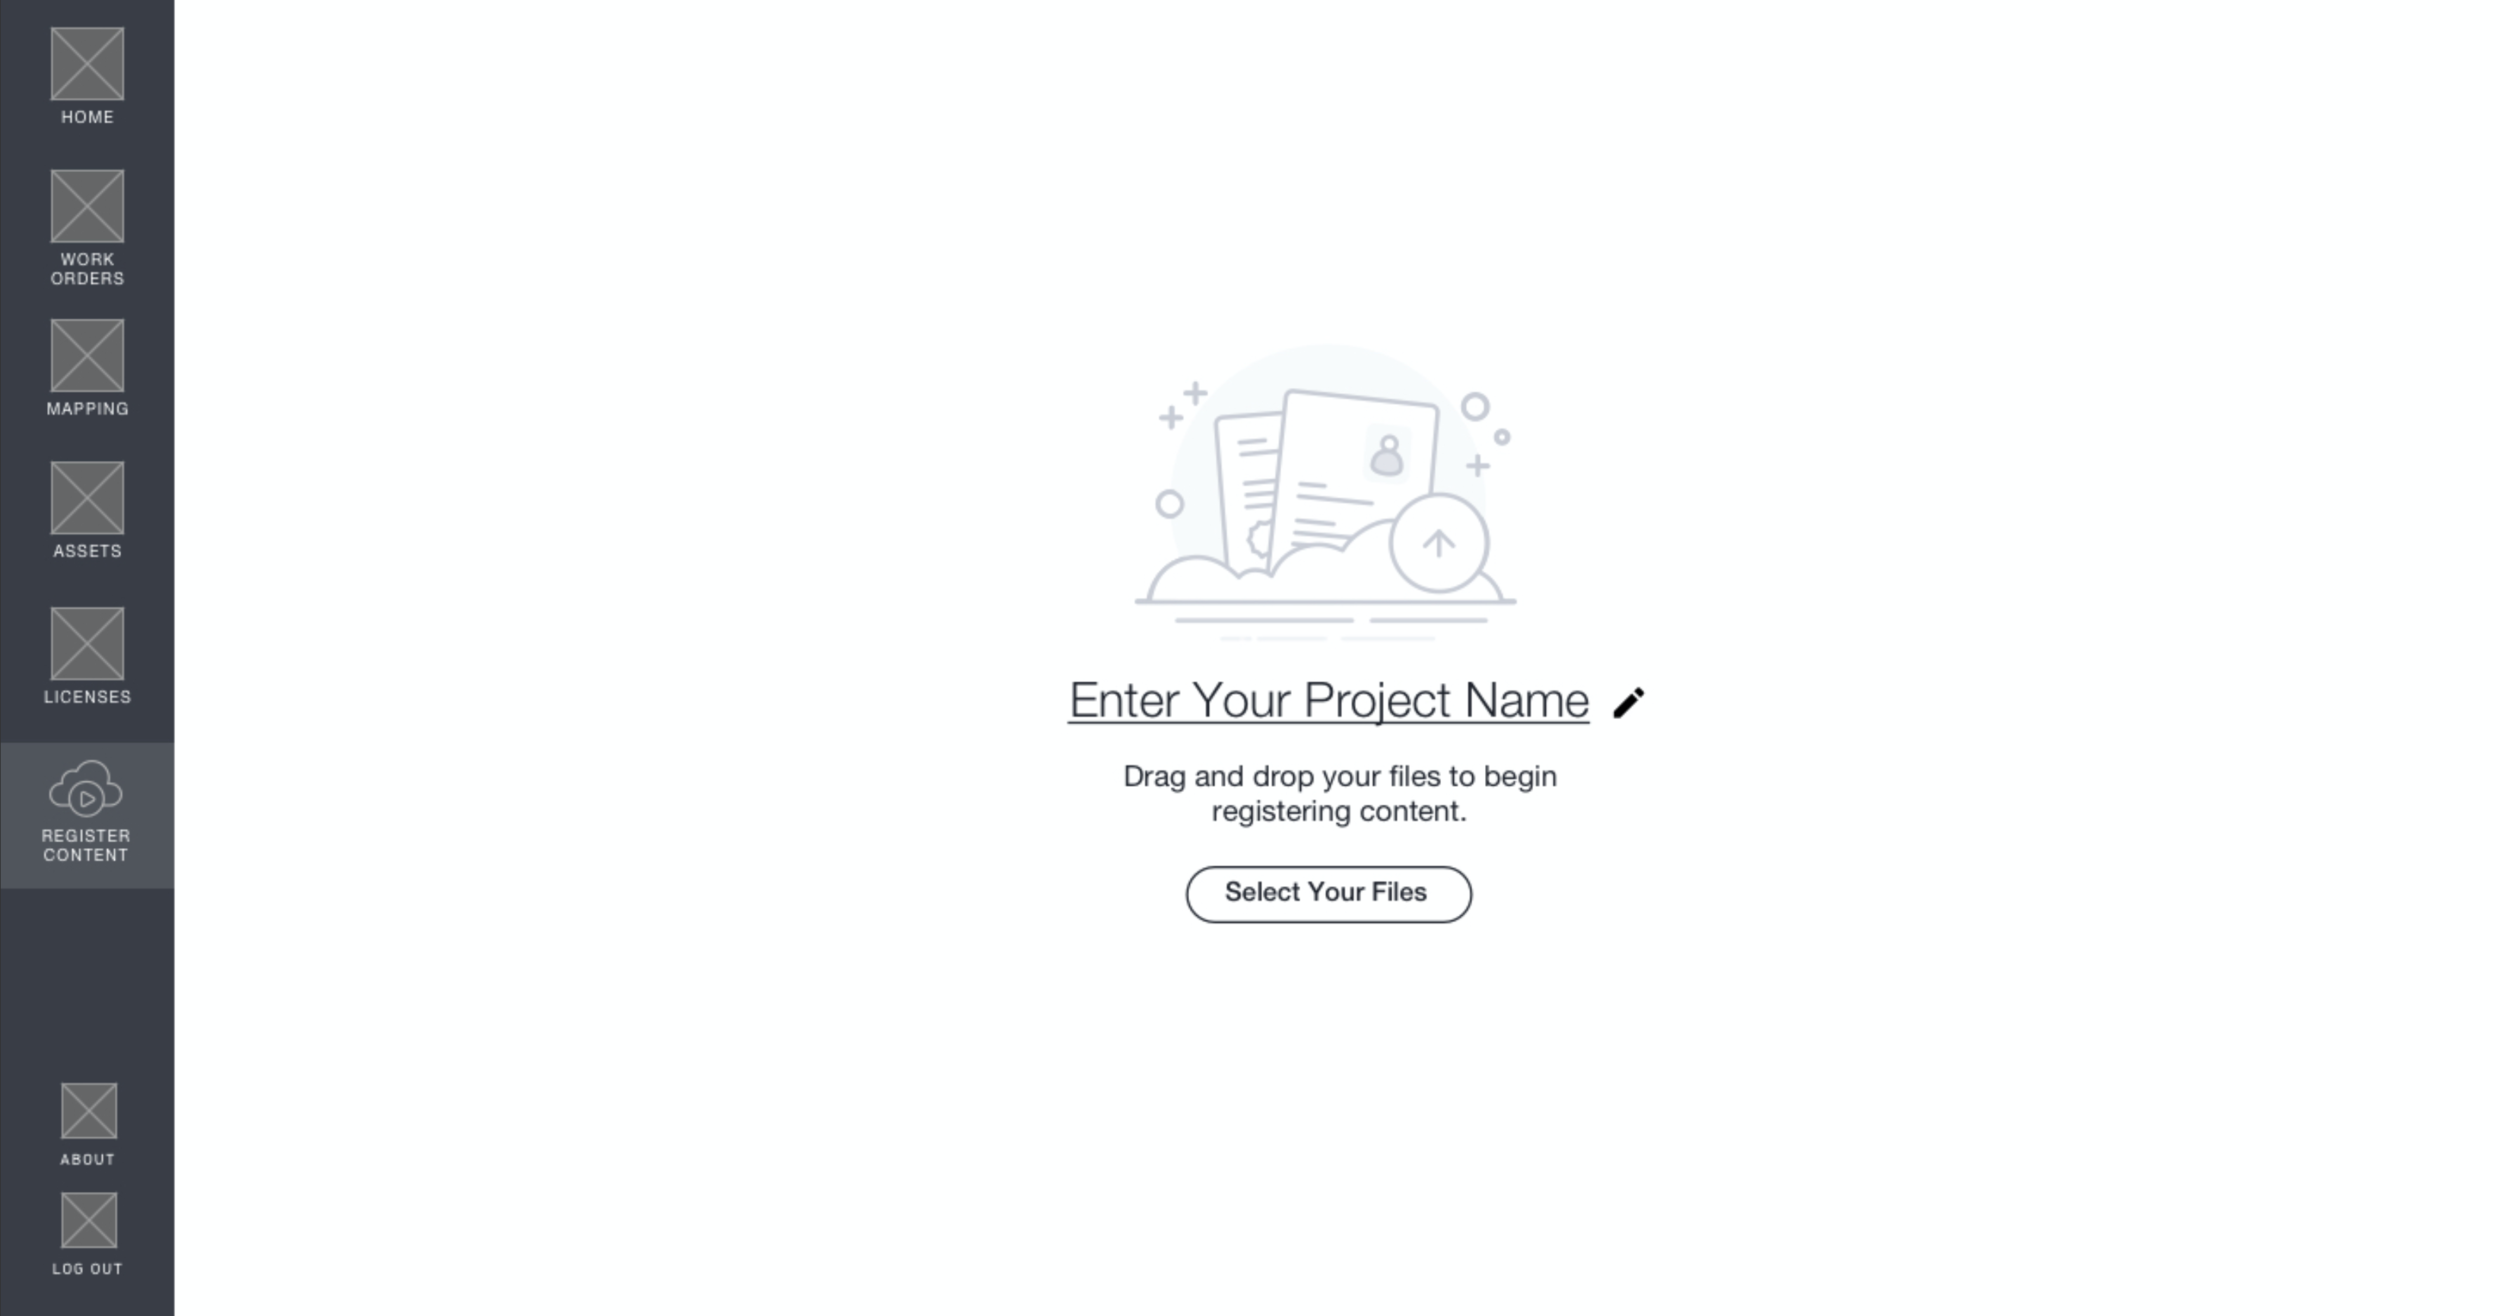
To create a project in the system, users can either select files from their drives or bulk drag and drop files into this area. They can edit the project name before and during adding assets.
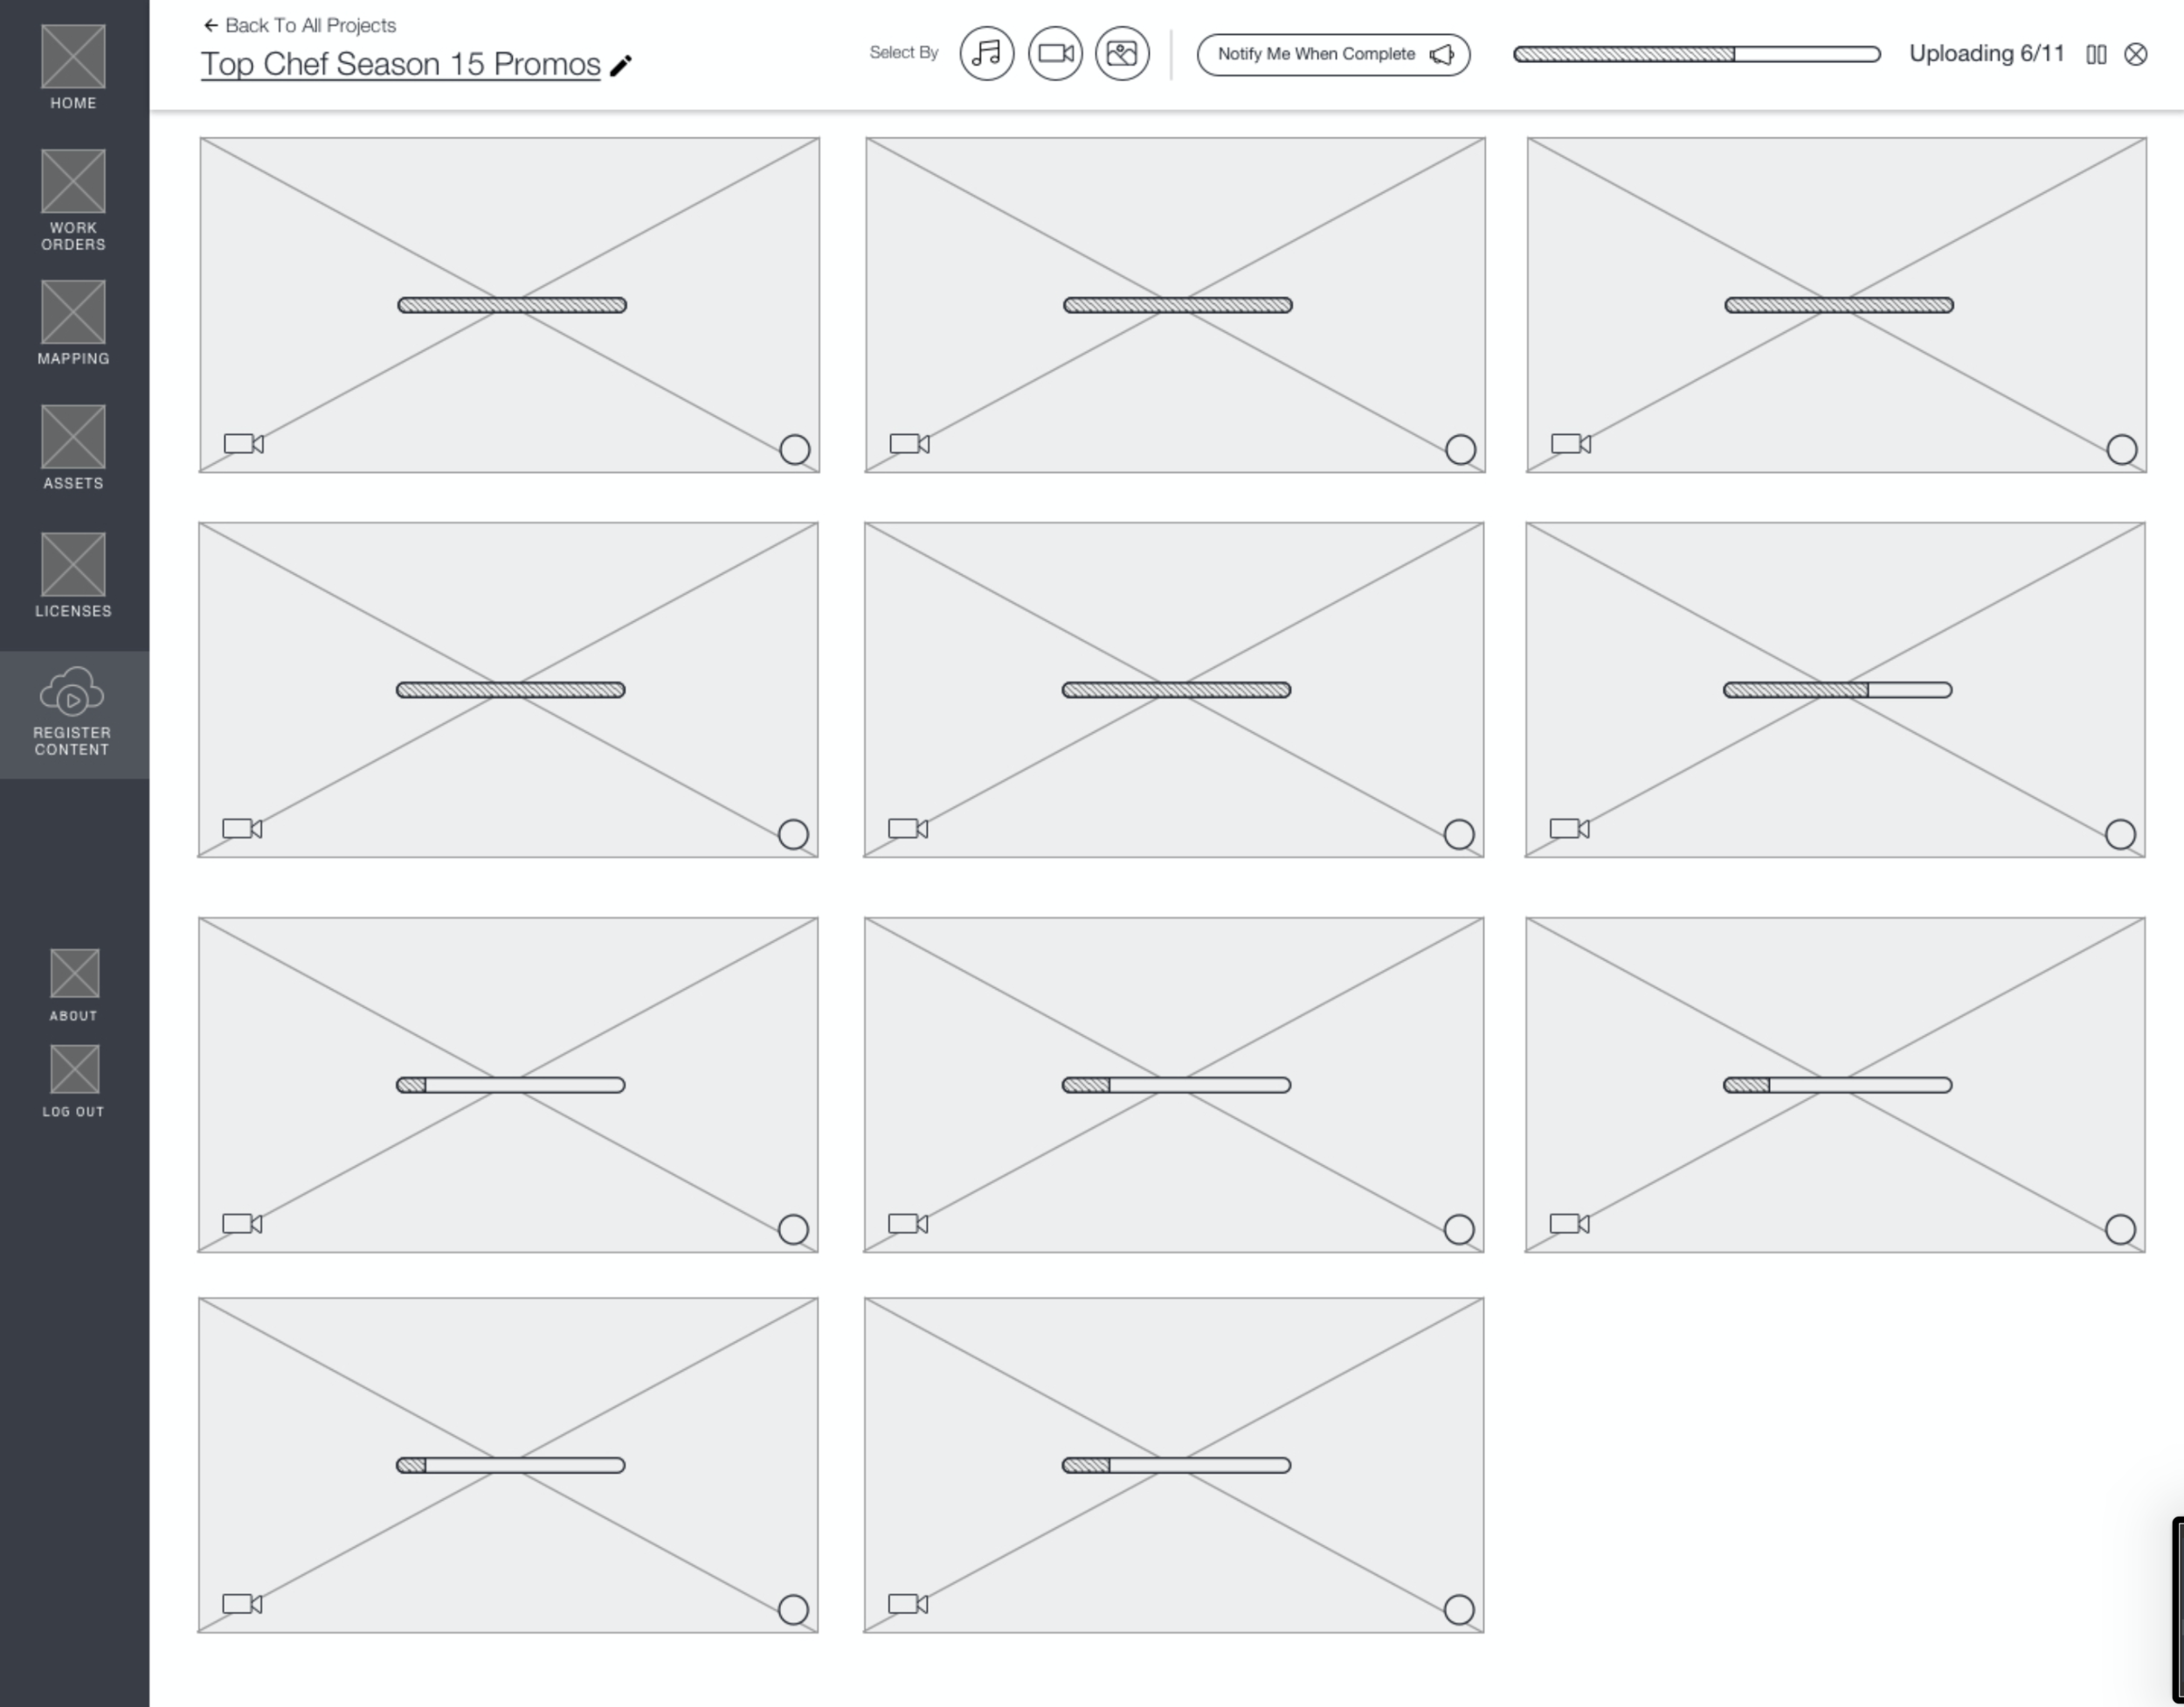
We will show users the upload status of each asset. As assets finish uploading, users can start to input metadata for them by tapping on them to open the editing fields.
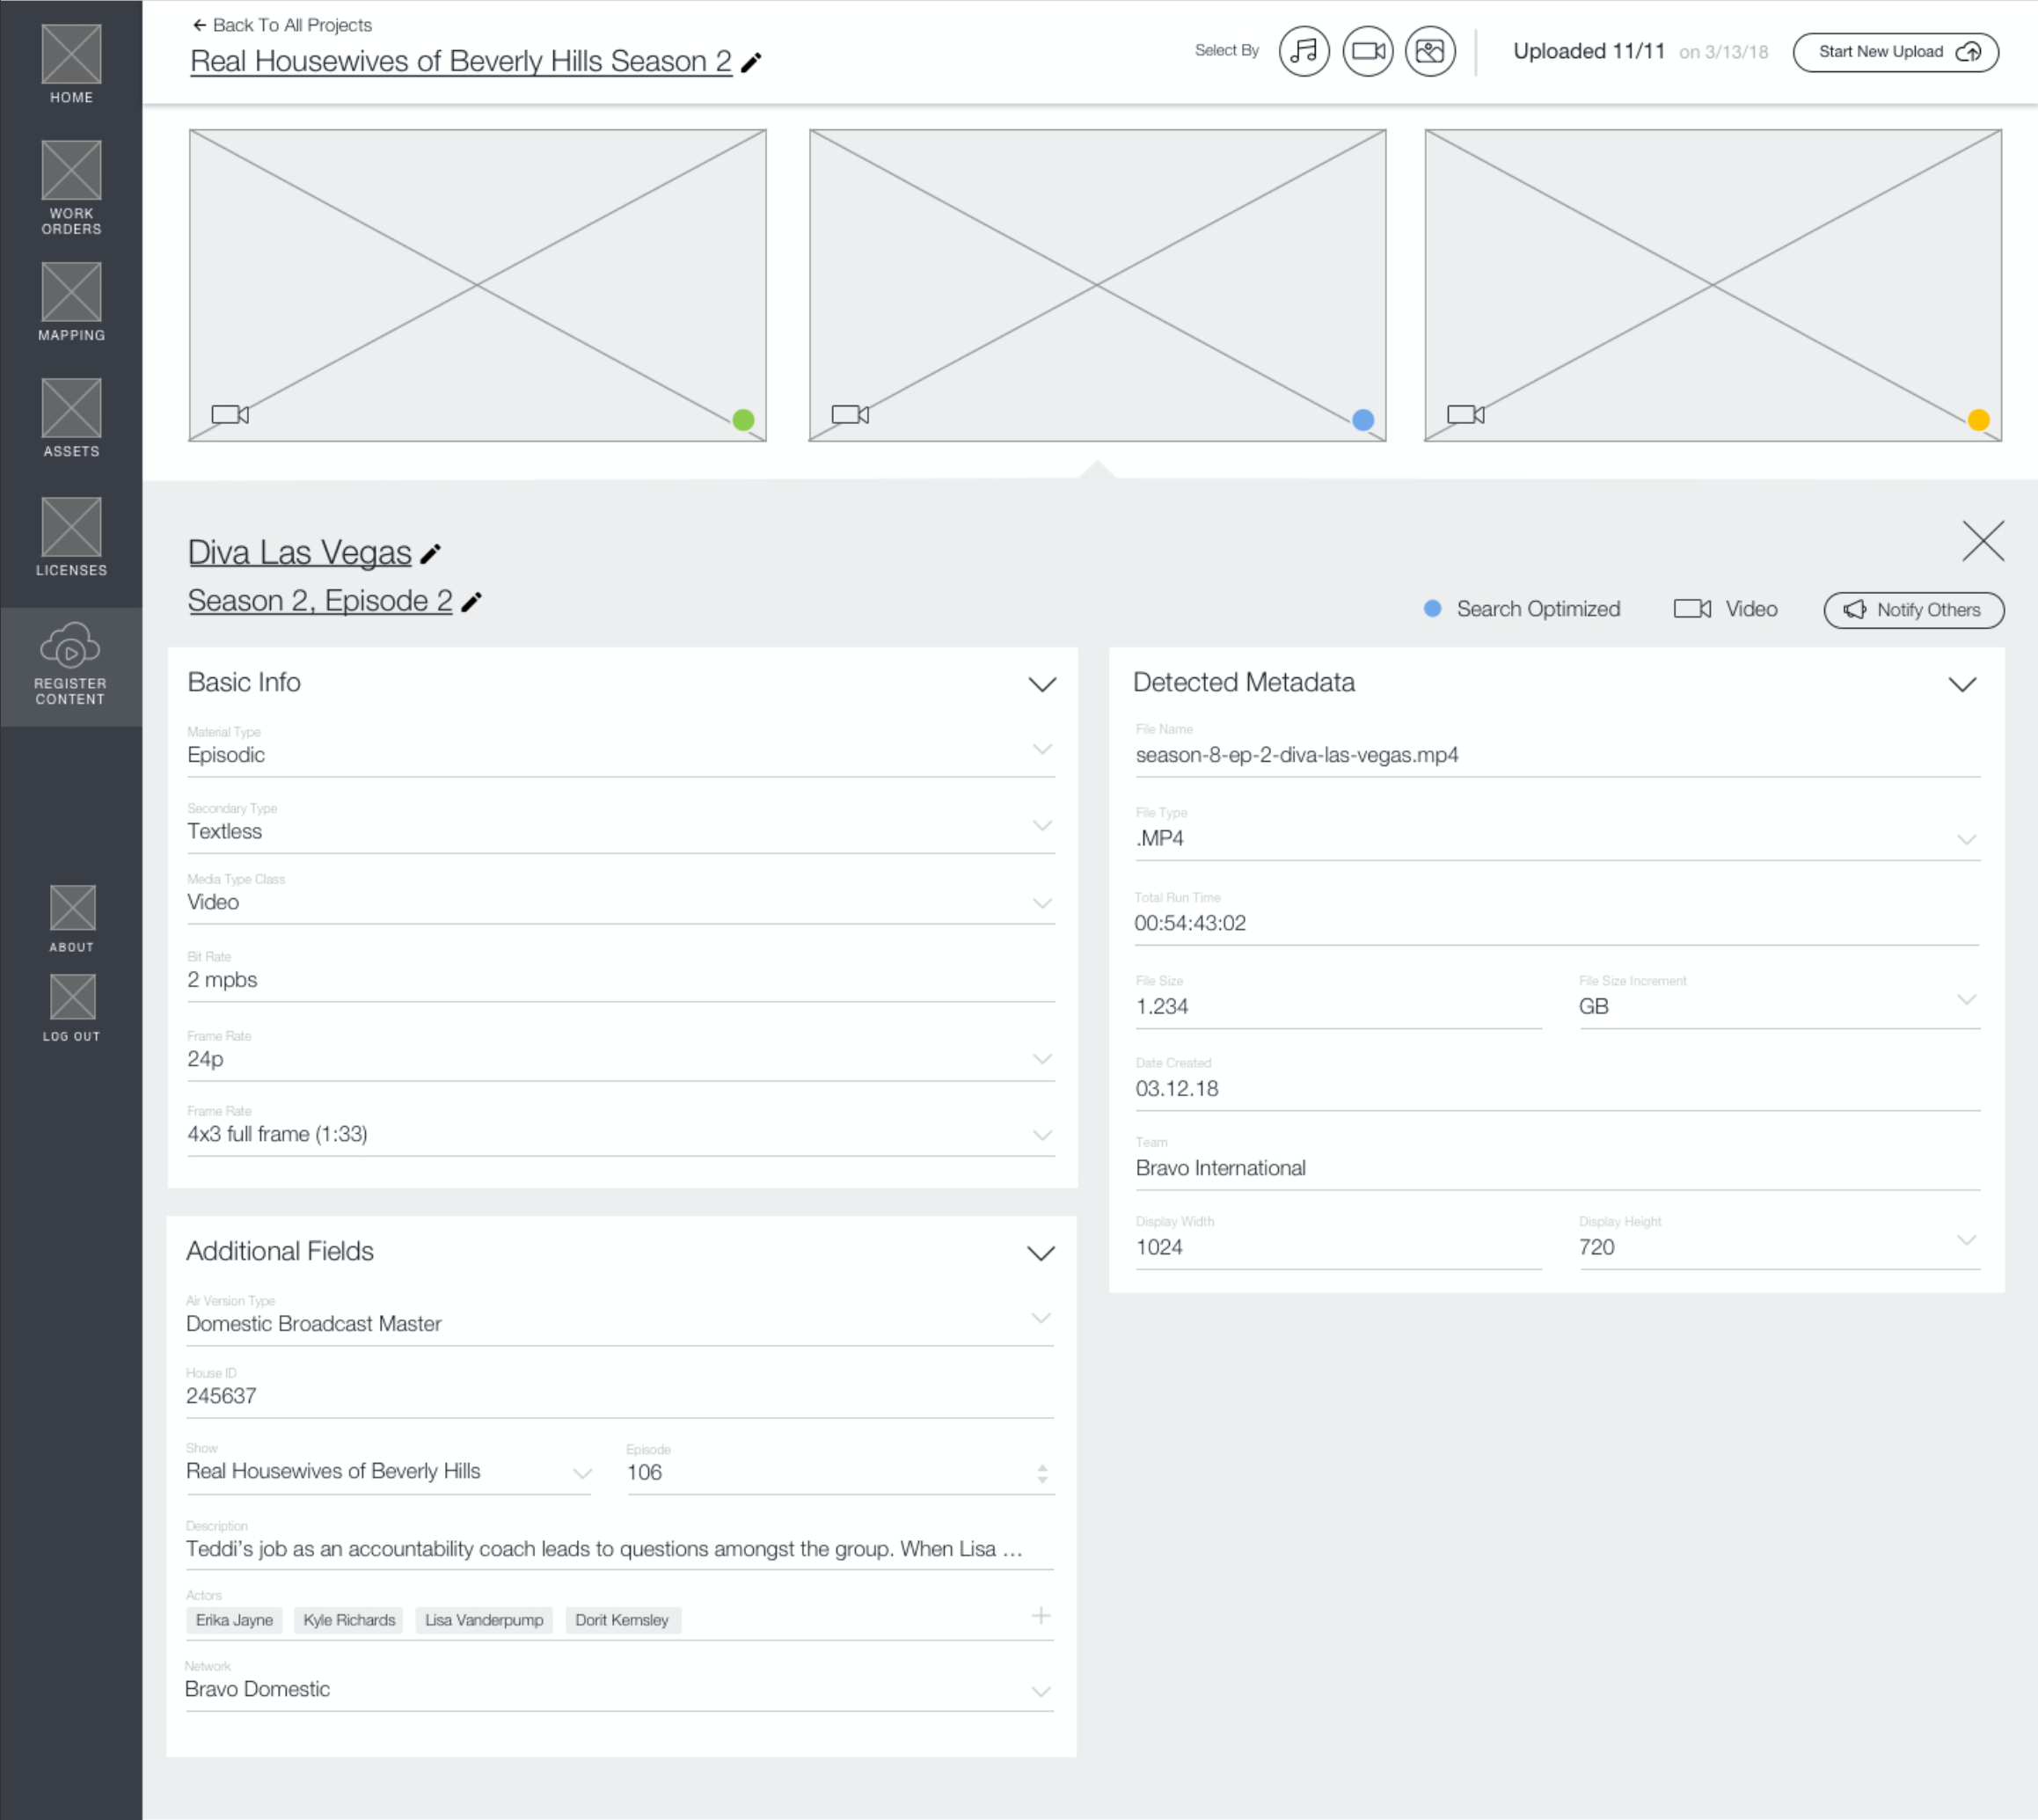
This is all the metadata for a video file that can exist in the MAM. Detected metadata is pre-populated in the system. Assets by default are “Ready for Ingest.” Filling out basic info makes the asset “Ready for Service.” When additional fields are filled out, the asset is considered “Search Optimized.”
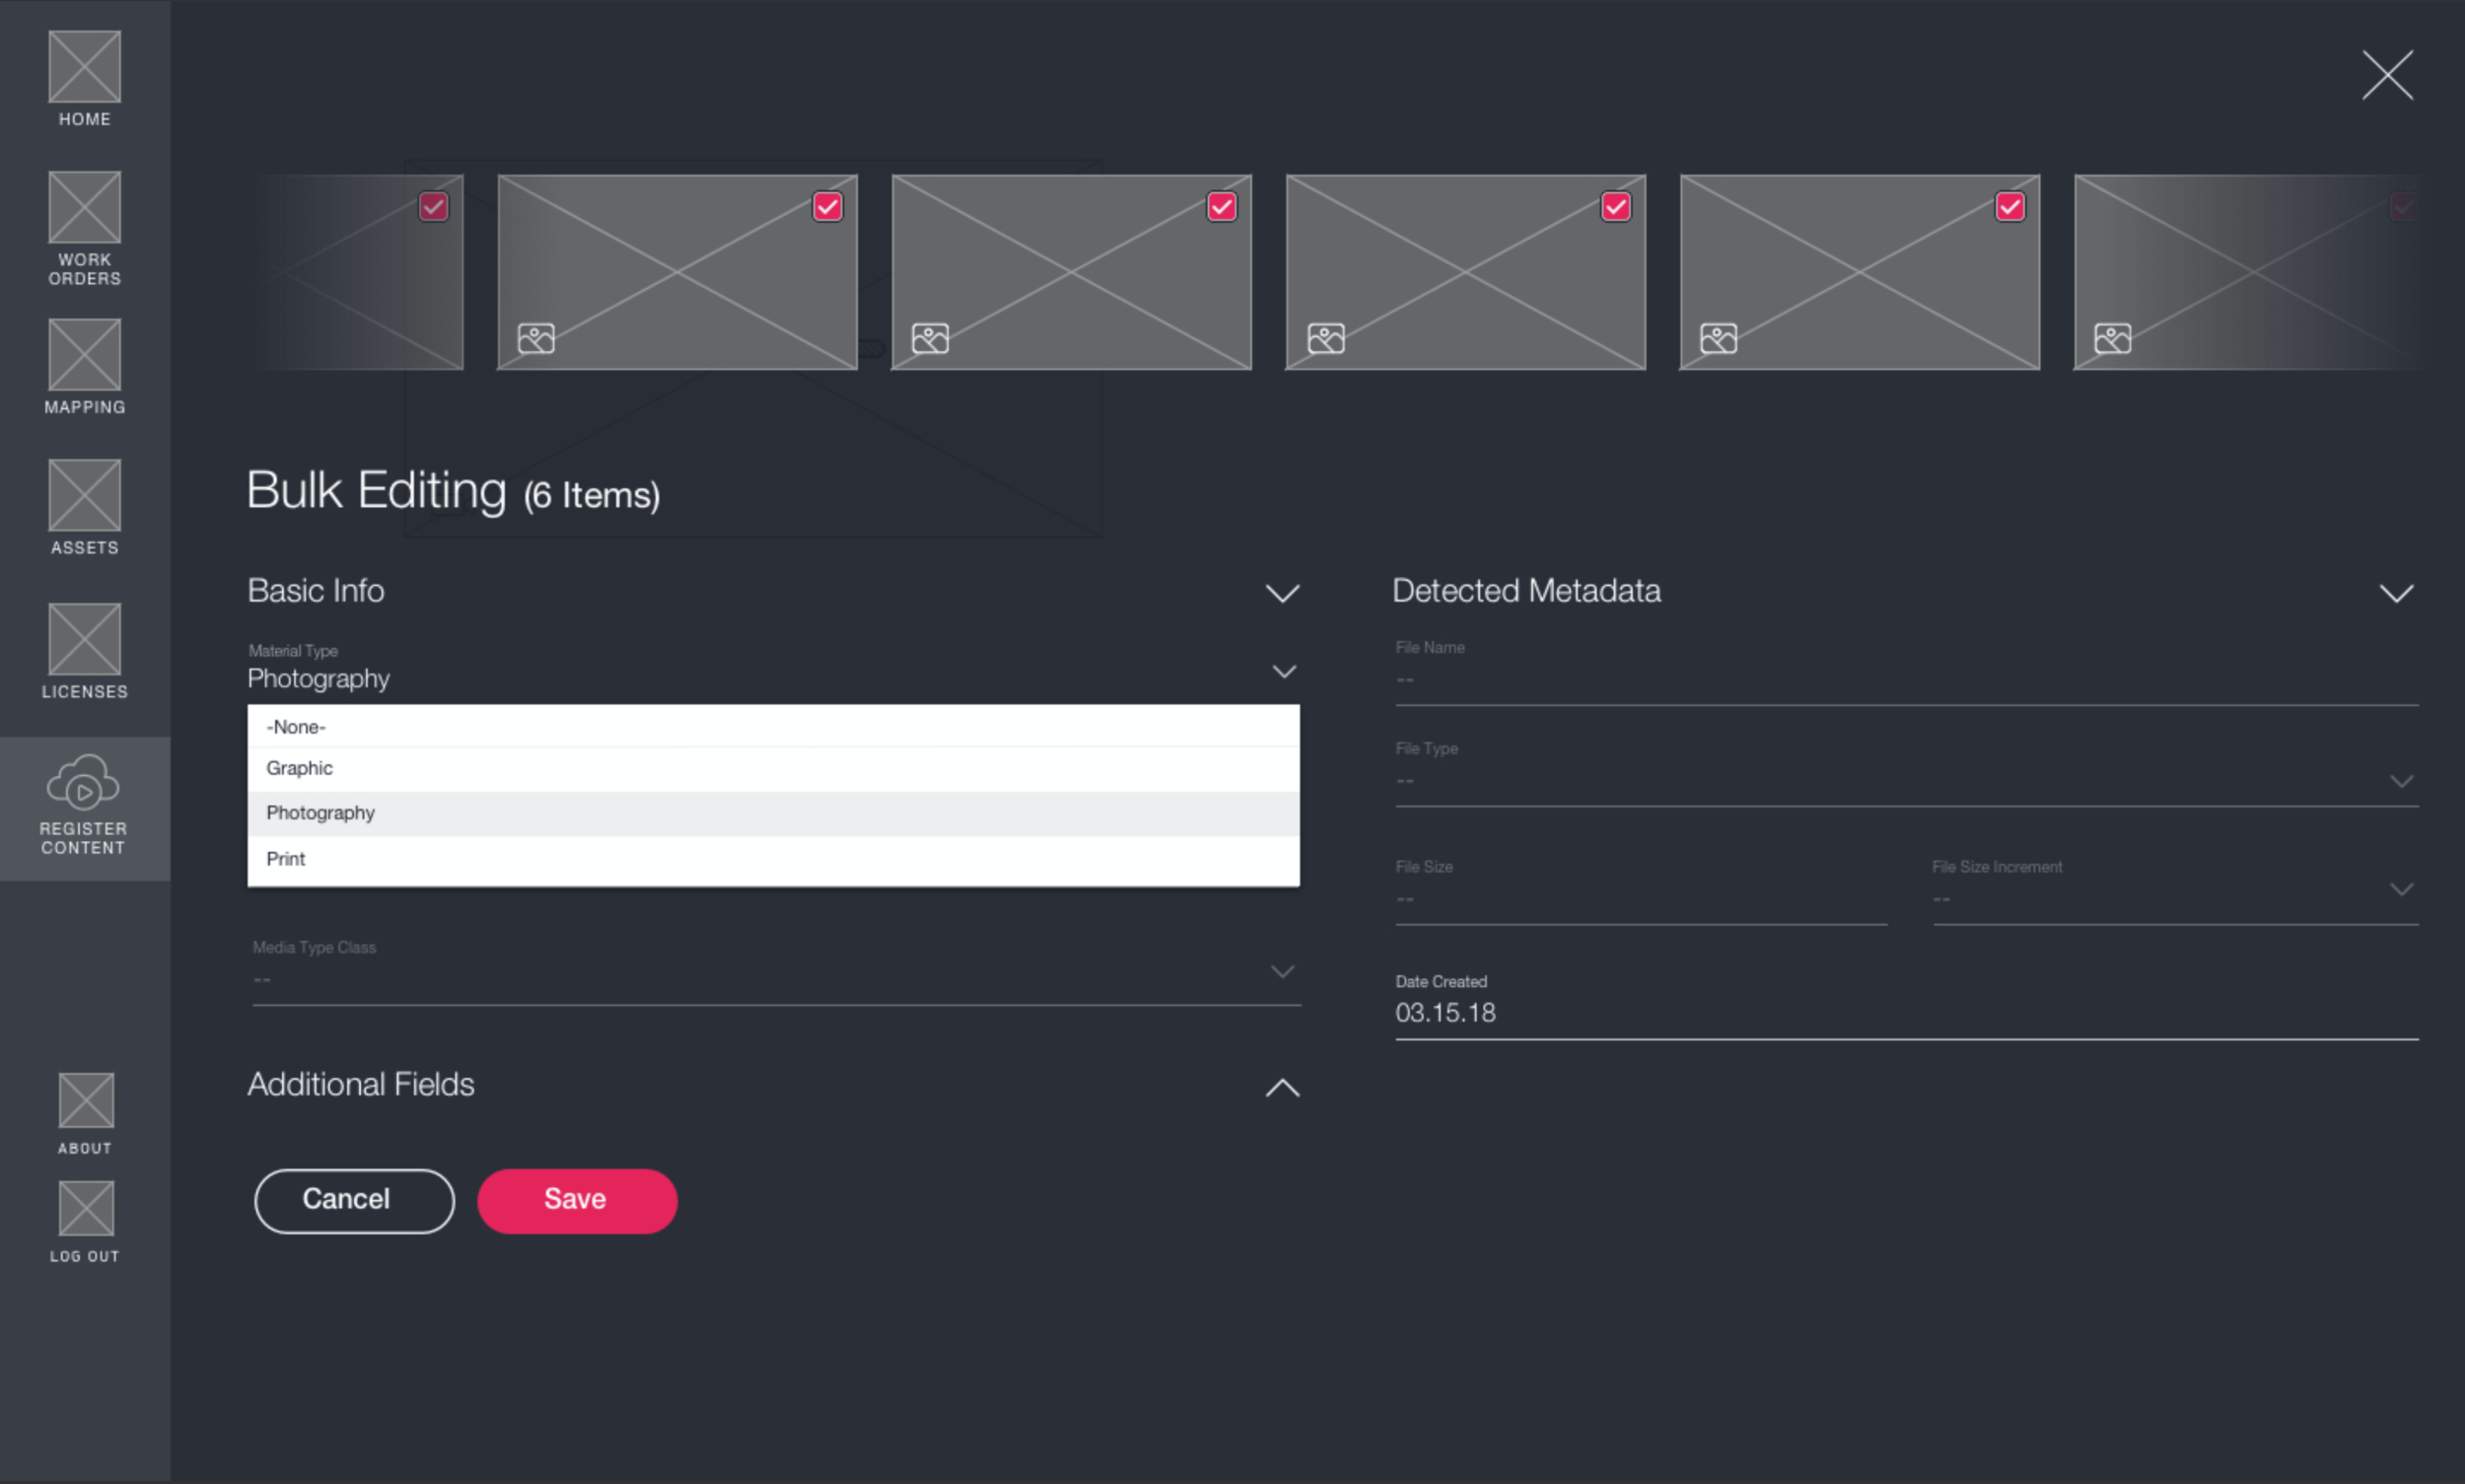
Users can select more than one asset and bulk edit specific fields that can be shared. Fields that cannot be bulk-edited are greyed out.
User testing I
We tested our prototype with the users and had them complete three tasks we outlined in our script. From there, we gathered all the comments and feedback from our users and in an experience mapping session, we consolidated all the changes we needed to address, the points we have already addressed, and we annotated elements that will be addressed in future phases of the project.
In the script we created for our prototype testing sessions, we instructed the users to perform three tasks:
Create a new project and register content
Edit an existing project item
Upload new content to an existing project and bulk edit
After the users did all three tasks, we asked them follow-up questions followed by having them complete a ratings sheet asking them to rate their experience registering content. Each user received the same script, but the content they uploaded were tailored to each brand.
View the experience mapping here. Below are the key takeaways from our first user testing session:

User testing II
In the second round of testing, we implemented changes based on the last session. We instructed the users to perform five tasks in our script:
Create a new collection with asset shells
Bulk edit metadata for assets and shells
Send notifications on a collection and asset level
Upload against an existing title
Interacting with the landing page
We added a new masonry grid view since users wanted a bigger preview of the content without having to click into the file. With the new masonry grid and the regular list row format, users can now collapse and re-arrange cards around to customize their view of their landing page and metadata forms. Required fields are now indicated on the metadata forms. We also created the concept of file asset shells where users with metadata beforehand can input them into the system before they upload the assets since that scenario occurs pretty frequently. View the experience mapping from the second testing here.

Design
Here is the design we arrived at. We decided to have 2 versions: a dark theme and a light theme since a lot of production folks work in a dark room and said that a dark mode would be something that would be better for their eyesight. Here are the prototype screens compiled in a PDF format. From the second user testing session, we got a lot of good feedback we were able to incorporate into the final design:
Marquee selection
Ability to drag files into shells
File names are shown in the masonry grid view
Sending notifications to team members and oneself when assets are ready